
How to Photograph a Sand Dollar
Decide first which photograph you are making, because two different jobs get called the same thing. A documentation photograph has rules: both faces plus the edge, shot flat on, whole object in frame, plain neutral background, even light, and a ruler or a coin lying beside it, because a photograph with no scale in it is nearly useless to anyone trying to identify what you found. A good-looking photograph has almost no rules except the one that matters most for this animal, which is that the light has to come from the side: lit from behind the camera a sand dollar is a flat white circle, and lit from low and off to one side it is a field of pores and plate seams you can count.
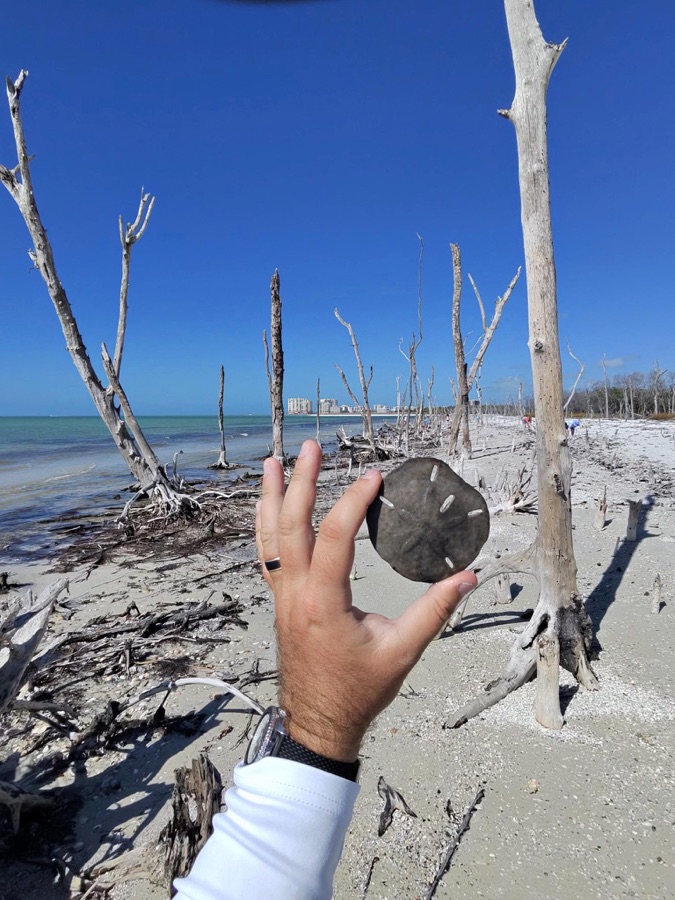
Two photographs, and only one of them has rules
Two entirely different jobs get called photographing a sand dollar, and almost every frustrating result comes from trying to do both at once.
The first is a documentation photograph. Its job is to let somebody who is not standing next to you work out what you found. It has rules, and they are not negotiable, because each one exists to preserve a piece of information the person on the other end needs. It does not have to be beautiful. It has to be complete.
The second is the good photograph: the one you keep, the one that shows what the morning looked like. It has almost no rules. It is allowed to crop the object in half, throw the background out of focus, and flatter the color.
Shoot the first one first. It takes about ninety seconds and it is the one you will wish you had. Every technique below says which job it serves, because a choice that helps one of them will often actively hurt the other.
The short version
- The five-petal figure, the petalodium, is a texture rather than a color. It is a field of pores in a pale surface, so it only reads in a photograph when something casts a shadow in it.
- Light raking across the surface from low and to one side puts a shadow in every pore and every plate seam. Light from behind the camera fills those shadows in and the disc goes flat.
- A blown highlight holds no data. No editing tool recovers detail that was never recorded, which is why the fix happens before the shutter, not after.
- Open shade is a huge soft light source and direct midday sun is a small hard one. A camera holds the range in open shade and clips in the sun.
- Identification often turns on the underside: the mouth, the food grooves, and the anal opening near the margin. Most people photograph only the top.
- The whole rim has to be in the frame, uncropped, or nobody can count the slots. Five enclosed slots, six enclosed slots, and notches open to the edge are three different animals.
Your captain reads the tide, picks the day's beach and helps identify what turns up.
Find these on a tourThe documentation photograph, in the order you shoot it
This is the whole procedure. It works on a beach, on a boat rail, or on a table at home.
- Three frames, not one. The top face, the bottom face, and the edge seen straight on. Most people shoot only the top, and identification frequently turns on the other two.
- Flat on, square to the camera. Look straight down. An angled shot distorts the outline into an oval, and the outline is one of the things being judged.
- The whole object, nothing cropped, the rim especially. Slots and notches get counted at the rim, and a frame that clips the edge makes the count unverifiable.
- A plain, matte, neutral background. No wood grain, no patterned towel, no figured stone.
- A scale in the frame, lying in the same plane. A ruler is best. A coin will do.
- Even light, and no flash. Direct light from the camera is the one lighting choice that will reliably erase the surface detail you are photographing.
- Check before you move on. Zoom all the way into the picture you just took and look at the petals.
The bottom frame is the one people skip and the one that earns its place. The underside carries the central mouth, the food grooves running out from it, and the anal opening close to the margin, which surprises almost everyone. The edge frame settles whether you are holding something flat or something domed.
Raking light is the single most useful thing you can do
The five-petal figure, the petalodium, is not a color. It is a texture: a field of tiny pores set into a surface almost exactly the same shade as everything around it. So is the rest of what a bare test has to show, the seams between fused plates, the lip of a slot, the fine grooves underneath.
Texture becomes visible in a photograph only when something casts a shadow, and shadow comes from the angle of the light. Put the light behind the camera, which is what a flash does and what standing with the sun at your back does, and every shadow falls directly away from you where you cannot see it. The result is the picture nearly everyone takes: a flat white circle with a ghost of a pattern on it.
Now bring the light around until it comes from low and off to one side, almost grazing the surface. Every pore gets a bright rim and a dark rim. Every plate seam draws itself. The petals lift out of the disc. Nothing about the object changed. The shadows did, and shadows are how a flat picture communicates a solid shape.
Getting it is easier than it sounds, because you can turn the object instead of moving the light. Set the disc down and rotate it slowly while watching the screen. There is an angle where the petals snap into relief and you will know it when you pass it. Outdoors, early and late sun does this for nothing. Indoors, a window on one side with the disc close to it and edge on to it does the same. The anatomy page covers what all that raked light is actually revealing: the petalodium, the lunules, the food grooves, the mouth and the anal opening.
If the shadowed side goes too dark, do not add light from the camera. Stand something pale on the far side, a folded shirt or a sheet of paper, and let it bounce a little back. You keep the shadows and only soften them.
Open shade beats direct sun, and there is a catch
Direct midday sun is a tiny, extremely hard source a very long way off. It produces a contrast range wider than any camera can record in one frame, and on a pale object the outcome is predictable: the lit surface goes blank white with nothing in it and the shadows go black with nothing in them.
Open shade is the opposite. Step into the shadow of a building or a canopy with clear sky still open above you, and the light source becomes the whole sky: enormous, soft, even. Nothing clips. Shadow edges you could not point to. Color comes out faithful instead of scorched. For a record frame this is the light you want, and it costs three steps sideways.
The catch is that soft even light is also flat light, which is exactly what the section above told you to avoid. Both are true, and the resolution is that they are different frames.
- The record frame gets open shade: honest color, honest tone, the whole outline readable, nothing burned out.
- The texture frame gets a low hard source off to one side, so the surface reads.
Two frames, two jobs, twenty seconds apart. One frame asked to do both is where people spend an hour and come away with nothing. Worth knowing: shade lit by open sky runs cool, so a white test can photograph faintly blue. Correct it gently afterward, or set white balance while you are standing there if your camera lets you.
How to stop a white disc from blowing out
The commonest failure in a sand dollar photograph is a highlight with nothing in it. The surface reaches pure white in the file and stops, and every pore and seam inside that region is gone.
Understand this one clearly, because it is the mistake that cannot be repaired. A frame that came out slightly too dark still contains everything and can be lifted later. A blown highlight contains nothing, anywhere, ever.
The cause is straightforward. A camera meters the frame and picks an exposure for the average of what it sees. Put a small very bright object on wet sand, on a palm, on a dark shirt, and the average is nowhere near as bright as the object is. The camera exposes correctly for the frame and overexposes the thing you are photographing.
The fix is exposure compensation, downward. On most cameras that means touching the object on the screen to set exposure there, then dragging the control that appears down until the surface stops looking like a cut-out shape and the texture comes back.
We are deliberately not giving you a number, and you should distrust any page that does. How far down depends on your light, your background, and how much of the frame the object fills. The check is on the screen, not in a setting: look into the brightest part of the disc, and if there is no surface in it, go further down. If your camera can show you which areas are clipping, turn that on.
One reversal, because it will catch you eventually. Fill the frame edge to edge with a white test on white paper and the average genuinely is bright, so the camera swings the other way and renders the whole thing a dull gray. Then you go up. The rule under both cases is the same: watch the surface, not a number.
The background: plain matters more than pretty
For a record frame the background has one job, which is to disappear while leaving the outline unmistakable.
- Plain. No grain, no weave, no pattern, no writing. A busy surface behind a pale fretted object makes it hard to see where the object ends.
- Matte. Anything glossy throws reflections and hot spots that fight the subject.
- Neutral in color. A strongly colored surface pushes a cast onto a white object and onto the camera's judgment of what white is.
- Middle in tone, not white and not black. This is the part people get wrong. White on white loses the edge and drives the meter toward rendering everything gray. Black looks handsome and drives it the other way until the disc clips. A middle tone gives both the outline and the exposure somewhere sensible to sit.
You do not need to buy anything for this. The back of a notebook, a folded plain shirt, a piece of card, flat wet sand in even light: all fine. On the boat it happens against whatever plain surface is nearest, and that is fine too.
A scale in the frame, and in the same plane
A photograph with no scale in it is nearly useless for identification. Size is one of the few characters anyone can judge from a picture, and with no reference the disc in your frame could be the width of a thumbnail or the width of a plate. People try to patch this in the caption, and what comes back is a guess wrapped in politeness.
- A ruler with visible units. Lay it against the rim so the marks and the edge are both readable. This settles it completely and nothing beats it.
- A coin. Perfectly good, and it is what is in your pocket. Say in words which coin it is, because a coin is only a scale to somebody who recognizes it, and a person answering from another country does not.
- A hand. Better than nothing and considerably worse than either of the above, because hands vary enormously.
One detail gets missed constantly and quietly wrecks the whole thing: the scale has to lie in the same plane as the object. A ruler propped behind it or held above it sits nearer to or farther from the lens, and things farther away photograph smaller. Put it flat on the same surface, touching the rim, and shoot straight down at both.
Getting close without losing focus
Every lens has a distance inside which it simply cannot focus, and everybody meets it the same way: leaning in for the petals, getting a soft frame, leaning in further, getting a softer one.
Moving closer helps right up to that wall. Past it the answer is back off and crop afterward. Step back until the picture snaps in, take a sharp frame with room around the object, then crop it down. A sharp frame cropped is a sharp picture. A close frame that never focused is nothing.
- Tap the part you care about, so the camera focuses there and not on the background or the nearest edge.
- Pinching to zoom is usually just cropping, done for you, before you can check the result. Moving is better than zooming, up to the wall.
- Hold still, and hold still differently. Close up, the ordinary sway of standing is enough to drift in and out of focus. Rest the camera on the same surface the object is on, or press your elbows into your ribs, and breathe out before the shutter.
- Check at full magnification before you walk away. Everything looks sharp at thumbnail size, which is how people get home with forty soft photographs.
The curve problem, and the simplest way around it
A sand dollar is a low dome, not a flat disc, and up close that matters more than it looks. At short distances the band of sharpness in front of the lens is shallow, and the top of the dome and the rim are not the same distance away. Shot close in from a low angle, the near edge is sharp, the middle is passable and the far edge has gone soft. It reads as a focus mistake. It is geometry.
Two things fix it, and one of them fixes it almost entirely.
- Back off and crop. The band of sharpness deepens quickly as distance increases, so a frame shot from farther away and cropped will hold both the rim and the center when the close frame could not. Conveniently, this is the same move as the focus fix above.
- Shoot square on, straight down. From directly overhead every point on the rim is the same distance from the lens, and the only depth left to cover is the height of the dome, which is small. From an angle the rim spans a far wider range of distances and the problem doubles.
If you still cannot hold all of it, focus about a third of the way into the depth you need rather than on the nearest or highest point. For a record frame, sharp petals with a slightly soft far rim is usable. A sharp far rim with soft petals is not.
Wet or dry, and why they photograph like two objects
The same test looks like two different things depending on whether it is wet.
Wet darkens and saturates it. Whatever color survives comes up, the contrast between the pores and the surface increases, and the petals often read more clearly than they do dry. The cost is gloss: a wet surface throws specular highlights, and in sun those highlights are the brightest thing in the frame and clip first. Wet plus open shade is a good combination. Wet plus direct sun is usually a mess.
Dry is chalky, pale and matte, which makes it look flatter in even light and considerably better in raking light, because a matte surface holds a graze of light and a glossy one just mirrors it back. A dry test in low side light is where the plate seams show best.
Shoot both if the chance is there, and say which was which in the caption, because anyone judging color from your picture needs to know.
One caution about wetting one on purpose. A wet test handles more forgivingly than a dry one, so on the beach nothing is lost. But drying is a genuine failure mode for a fused skeleton roughly a millimeter thick, and putting an intact dry test through another soak and dry at home to improve a photograph is a trade with a real downside. Why sand dollars break covers the structure behind that. If it is home and intact, photograph it dry.
Composition, for the photograph you actually want to keep
Here the rules stop. This frame has one obligation, which is to be worth looking at.
- The beach it came from beats a kitchen counter, every time. The counter says nothing. The beach carries the whole reason the picture exists: the light that morning, the texture of wet sand, the wrack line behind it, the water going out. It is also more honest, because it shows the thing where it was instead of as a product.
- Get low. A camera held at chest height pointing down makes the picture everybody already has. Down at sand level the disc gets a horizon behind it and the light comes across it rather than down onto it.
- Take the frame before you pick it up. The best photograph of a sand dollar is usually from the ten seconds before anyone touched it: sitting in the sand it settled into, half in the swash, casting its own shadow. Once it is in a palm it is a specimen.
- Low sun does three jobs at once. It rakes the surface, warms the color, and throws a long shadow that gives the disc weight.
- Use the wet sand. A film of water underneath gives you a reflection, and a reflection anchors the object instead of leaving it floating.
One thing not to do. Do not arrange a haul you did not take, and do not stage a living animal for a picture. Time out of water costs a live one something real, and no photograph is worth that.
What to send when you are asking for help with an identification
If you want a name, the pictures are only half of what you send. Include all of this.
- Three frames: top, bottom, edge on.
- The whole outline, uncropped, so the slots or notches can be counted. Five enclosed slots, six enclosed slots, and notches open to the rim are three different animals, and counting is the fastest move in the whole business.
- A scale, lying in the same plane.
- Where, as precisely as you are comfortable being: the beach or the water, the county, the coast at minimum. A specimen with no locality is a decoration. With locality, date, habitat and finder it is data.
- When. The date.
- How you found it: wet sand at the waterline, up in the dry wrack, tumbling in the swash, on a bar at low water.
- What it looked like when you found it, dark and fuzzy or white and chalky, and whether it was wet or dry in the photograph.
- What you already ruled out, and why.
Send the frames unedited, or as close to it as you can manage. Heavy contrast and saturation are precisely the moves that destroy evidence: they push pale surfaces to white and shadowed pores to black, and that is the information being asked about.
An honest limit, said out loud. A beach-worn test may not be identifiable to species from any photograph, however good, and some names here are genuinely contested. The Encope problem is a live disagreement between a global taxonomic register and a peer-reviewed molecular study. The real value of a proper documentation photograph is that it lets a knowledgeable person tell you honestly they cannot be sure, rather than guess from a pretty picture. Record what you see, not what a label says.
Photographing instead of taking
The lowest-impact way to collect anything is to photograph it and leave it.
That matters most with a live one. A dark disc covered in dense short spines that move is a living animal, and the answer is a photograph and then the water, set down right side up near where it came from. How to tell whether a sand dollar is alive runs the whole field test. Our rule aboard is short and it is ours: empty shells only.
It matters for empty tests too, in ways worth listing plainly.
- A photograph weighs nothing and does not break in a bag. A skeleton a millimeter thick very often does.
- A photograph is lawful where collecting is not. Florida State Parks prohibit removing shells, sand, rocks or marine animals from any park area, empty shells included, and collecting is prohibited outright in Everglades National Park and in Ten Thousand Islands National Wildlife Refuge.
- A photograph carrying a locality, a date and a scale is worth more than an unlabeled object in a bowl, and you can have as many as you like.
The line on a live one is clean. Florida statute 379.101(34) defines saltwater fish to include living echinoderms and expressly excludes nonliving shells, so a live sand dollar needs a Florida recreational saltwater fishing license and an empty test needs nothing. Whether any numeric collecting limit applies to sand dollars is genuinely unsettled: two independent reviews of the rules reached different conclusions. We have asked FWC in writing and will publish their answer with the date. Until then we publish no number, in either direction. Read the rules yourself on FWC's recreational sea shell collecting page.
Out here
On a landing this comes down to about four instructions. Shoot it where it lies before anybody picks it up. Turn it until the light comes across the petals instead of straight at them. Get the three record frames with something to measure against, in the shade rather than the sun. Then make the picture you actually want.
If you want to know what the light is showing you, the sand dollar codex takes the animal apart part by part and species by species. If you would rather learn it with one in front of you, trips run three times a day out of San Marco Marina in Goodland and you can reserve a seat.
Questions people actually ask
How do I photograph a sand dollar so the petals actually show?
Light it from the side, low and almost grazing the surface. The petal figure is a texture, not a color, so it only appears when the pores cast shadows. Light from behind the camera, including any flash, fills those shadows in and the disc goes flat white. Easiest method: set the disc down and rotate it slowly while watching the screen. There is an angle where the petals snap into relief.
Why does my sand dollar photo come out as a plain white circle?
Two causes, usually together. The light is coming from behind the camera, so there are no shadows to reveal the surface. And the disc is overexposed: the camera meters the whole frame, the disc is much brighter than that average, and the surface clips to pure white. Move the light around to the side, and use exposure compensation downward until texture reappears on the screen.
Do I really need a ruler in the picture?
For an identification photograph, yes. Size is one of the few characters anyone can judge remotely, and without a reference your disc could be thumbnail-sized or plate-sized. A ruler with visible units is best, a coin is fine if you say which coin, and a hand is weak because hands vary. Lay the scale flat in the same plane as the object, touching the rim, not propped behind it.
Should I photograph a sand dollar wet or dry?
Both, if you can, and say which is which. Wet darkens and saturates it and lifts the pore contrast, but it goes glossy and throws highlights that clip in sun, so pair wet with open shade. Dry is chalky and matte, which looks flat in even light and excellent in raking light, and it is where plate seams show best. Do not soak an intact dry test just for a photograph.
Why will my camera not focus close up on a sand dollar?
Every lens has a minimum focus distance, and pushing past it makes things worse rather than better. Back off until the picture snaps into focus, shoot a sharp frame with room around the object, then crop. A sharp frame cropped is a sharp picture; a close frame that never focused is nothing. Backing off also deepens the band of sharpness, which helps on a domed object.
What should I include when asking someone to identify a sand dollar?
Three frames, top, bottom and edge on, with the whole outline uncropped so slots and notches can be counted. A scale in the same plane. Where you found it, the date, the habitat, whether it was dark and fuzzy or white and chalky when found, and whether it was wet or dry in the photo. Send them unedited: heavy contrast and saturation destroy the evidence.
Is it better to photograph a sand dollar than to take it?
Often, yes. A photograph weighs nothing, cannot break in a bag, and is lawful in places where collecting is not, including Florida State Parks, Everglades National Park and Ten Thousand Islands National Wildlife Refuge. With a live one it is the only good answer: photograph it, then set it back in the water right side up near where it came from. Our rule aboard is empty shells only.
Where this comes from
Every factual claim on this page traces to a published source. Where the science or the law is genuinely unsettled, we say so on the page rather than pick the tidier answer.
Come find them with us
Three trips a day out of Goodland, into water the road does not reach. Captain-led, family-friendly, and timed to the tide.