
How to Clean a Sand Dollar
Rinse it in fresh water while it is still wet and forgiving, soak it in plain fresh water changed whenever it clouds, then dry it slowly and flat in the shade for days rather than hours. Keep vinegar away from it entirely, because acetic acid dissolves calcium carbonate and calcium carbonate is what the object is made of, and treat bleach as a genuine trade rather than a step. Most sand dollars are not lost to dirt. They are lost to drying too fast, scrubbing too hard, and cleaning long past the point where there was anything left to clean.
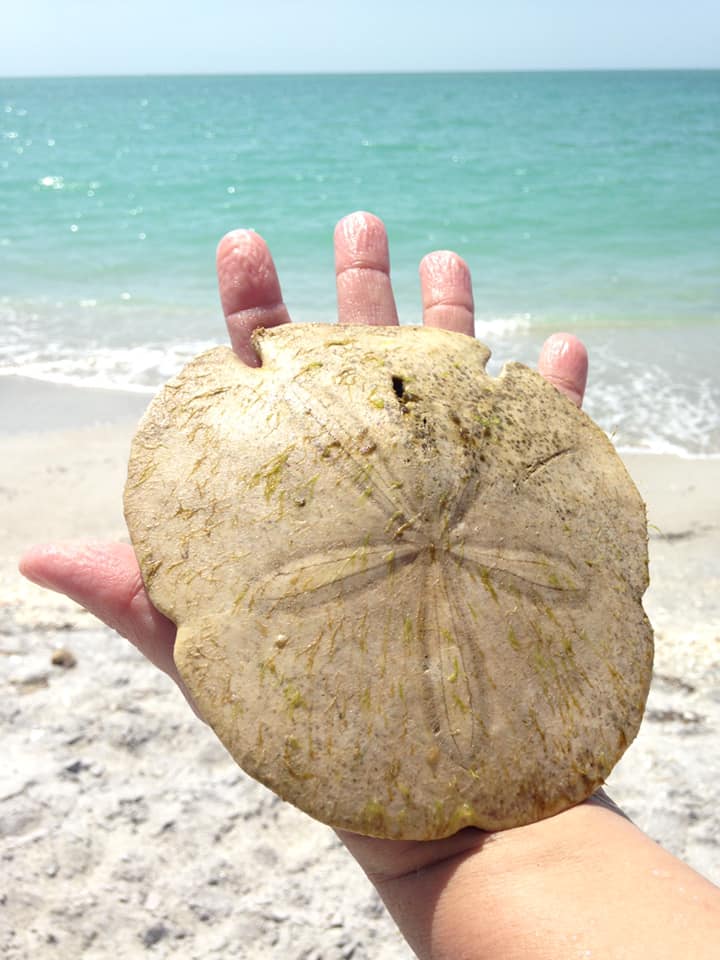
What you are actually cleaning off
Most instructions for this were written by somebody who wanted a whiter disc. That is a different goal from wanting the object, and it is why so much of the advice ends in a cracked or chalky test.
Work out what you are removing before you remove anything. There are four things on a beach-found sand dollar, and only three of them are dirt.
- Salt. Seawater has soaked all the way into the pore space. Left there it dries as crystals inside the material and works back to the surface as a white bloom weeks later.
- Sand. Outside, in the pores and the plate seams. Inside, packed in through the mouth opening and the slots, which is why a dry test can be heavier than it looks and grinds faintly when you tilt it.
- Organic residue. Whatever is left of the tissue, plus the film of living things that colonizes any surface lying in warm shallow water. This is the part that smells.
- Staining. Green from algae, gray or black from burial in oxygen-poor mud, tan from iron or tannin. Some of it sits on the surface. Some of it is in the material, and no amount of soaking reaches it.
Now the shorter list, of what you are trying not to lose. The fine stippling where the spines attached. The crisp pore detail of the five-petal figure. A rim you can still feel as an edge. Whatever color the test still holds, which on a fresher one is worth more than white. And the structure itself: one fused, plated skeleton roughly a millimeter thick, doing all of the work.
Everything below is a negotiation between those two lists.
The short version
- The white disc is a test, a fused, plated internal skeleton roughly a millimeter thick, and every cleaning step acts on that whole thickness at once.
- Vinegar dissolves a test. Acetic acid attacks calcium carbonate, which is what the object is made of, so the fizzing that looks like cleaning is the specimen going away.
- Bleach destroys the periostracum on a shell and can damage color and structure. A test has no periostracum, but the material risk lands on a plate roughly a millimeter thick.
- A wet test tolerates handling that a dry one does not, so the first rinse should happen before it dries and not after.
- More specimens are lost drying on a counter than to anything that happened in the bowl. Slow, flat, shaded, turned once a day.
- A specimen without a label is a decoration. With locality, date, habitat and collector it is data.
Your captain reads the tide, picks the day's beach and helps identify what turns up.
Find these on a tourFirst, make sure it is empty
None of this applies to a living animal, and the mistake is easier to make than it sounds, because people clean at home, hours later, with the light gone and the find already in a bag.
A living sand dollar is brown, purple, gray or green, never white, and carries a dense coat of short spines that move. A recently dead one can still be dark and can still hold most of those spines. If what you brought back is dark, damp and heavy for its size, or if it smells strongly sour, you may be holding an animal rather than an object. Telling a live sand dollar from an empty test runs the whole field check.
Our rule aboard is empty shells only, and it is our own rule. The law behind it is worth knowing anyway. Florida statute 379.101(34) defines saltwater fish to include living echinoderms and expressly excludes nonliving shells, so a live sand dollar is an animal that requires a Florida recreational saltwater fishing license, while an empty test requires nothing. On City of Marco Island beaches live shelling is separately banned under city code section 54-36(o).
A white, chalky, light disc off the dry sand is what this page is for. Start there.
The first rinse, while it is still wet
This is the most important step on the page and almost nobody writes it down, because it does not feel like cleaning.
A wet test is a far more forgiving object than a dry one. Water fills the pore space, anything still soft stays soft, and the disc tolerates handling that a dry test simply will not. That condition does not last, and it does not come back. Once a test has dried out on a dashboard the window has closed, and wetting it again restores none of the tolerance: you are now soaking something that has already taken its stress. Why sand dollars break covers what happens inside the material during that first dry.
So handle it while it is wet. Rinse it before it dries, in the shallows, in a bucket of clean water aboard, or in the first sink you reach. What you want to move is the loose sand, the grit sitting in the seams, and the bulk of the seawater.
What you want to avoid is a running tap. A stream of water landing on an unsupported disc is a point load, and a point load is the one thing this shape cannot take. Fill a bowl, put the test in the bowl, and move the water rather than aiming it. Support the test flat on an open palm the whole time, and never pinch one between a thumb and a finger, wet or dry.
Soaking, and how to judge it
Plain fresh water, in a bowl or tub deep enough that the test is fully under. That is the entire recipe. Anything you add creates a second problem, which is getting that thing back out of a porous mesh afterward.
Change the water whenever it clouds and judge by the water rather than by the clock. Salt is quick: it comes out of the pore space in a matter of hours, and if all you are doing is pulling salt from a bleached test off dry sand, a few changes across an afternoon is the whole job. Organic residue is slower. A test that still smells, or that hazes the water every time you change it, is telling you it is not finished, and that one can run for days.
A test will often float at first, because there is air trapped inside it. Do not force it under with anything hard. A folded cloth laid over the top of the bowl will hold it down, and so will simply waiting.
Use cool water. Warm is not faster in any way that matters and hot is a heat problem, which is its own section below. And an honest limit: we cannot point you to a controlled study of soak times for a sand dollar test, and neither can the pages that give you a confident number. What is above is what the water tells you, which is the only instrument anybody actually has.
The bleach question, answered rather than dodged
This is what brings most people to a page like this, and most pages either recommend it in one line or refuse it in one line. Both are dodges. Here is the whole thing.
What bleach does. It oxidizes organic material. That is why it kills a smell and why it lifts the last of a tissue film or a green algal cast. It also whitens, which is the part people are really after, and that whitening is not purely the removal of dirt. Some of it is the bleach acting on the material itself.
Why the risk is real here. On a mollusk shell, bleach destroys the periostracum, the protein skin, and can damage color and weaken structure. A sand dollar test has no periostracum to lose, so people assume it is the safer case. The material risk does not go away. The test is calcium carbonate laid down as a fine open mesh rather than solid mineral, and a bleach solution goes straight into that mesh. Then the whole of that load lands on one fused plate roughly a millimeter thick with slots cut clean through it. There is no thick lip and no heavy body whorl here to absorb a mistake. An over-bleached shell looks bad. An over-bleached test goes chalky, leaves powder on your fingers, softens at the rim, and often comes apart in the drying that follows.
The cost nobody mentions. Bleaching is not a step. It is a second full soak and a second full dry, and drying is where tests are actually lost. You have doubled your exposure to the real failure mode in exchange for appearance.
Where collectors genuinely disagree. Plenty of experienced people use a very dilute solution, briefly, watched the entire time, followed by a long rinse through several complete changes of fresh water. Plenty of others, equally experienced, will not put a test near it, on the grounds that the damage is invisible until it is not, and that none of it reverses. Both camps have shelves full of intact specimens. This is not a case where one side is uninformed and the other is careful.
What we do. We do not bleach. The whitening most people are chasing is something the sun and the surf already did for free, and the reason a test is white in the first place is simply time, which why sand dollars turn white covers properly. A test that still holds enough color to bother you has not been dead long, and that is information rather than a flaw.
What we will not give you is a number. No concentration and no minutes. Every recipe published for this contradicts the next one, we have found no controlled study behind any of them, and a figure invented here would be one person's habit wearing the clothes of a standard. If you are going to do it anyway, the next section is how to do it with the least exposure.
If you use bleach anyway
No lecture. It is your specimen, and the trade-off above is a real one that reasonable people decide both ways. These are the practices that reduce the damage, and none of them require a number.
- Test on a broken piece first. Everybody has fragments. Put one through exactly what you intend to do to the whole test, then look at it dry the next day. This single habit prevents most of the disasters on this page.
- Dilute heavily. Think in terms of a hint of bleach in a great deal of water, not a solution you would wipe a counter with.
- Watch it the entire time. Do not start a soak and go do something else. Nearly every ruined test sat in the bowl longer than its owner intended.
- Take it out when the residue lifts, not when it looks whitest. Those are two different moments and the second one is past the damage.
- Rinse far longer than you soaked, through several complete changes of fresh water. Bleach left in the pore space keeps working after you have stopped paying attention to it.
- Dry it by the slow method below, and expect it to be more fragile than it was going in.
- Never on a cracked or repaired test. A crack is a channel straight into the interior, and anything already glued will let go.
If that reads like more trouble than the result is worth, that is a reasonable conclusion and a great many collectors have reached it.
The four things that genuinely destroy a test
These are not cautions. They are how specimens are actually lost, in rough order of how often we hear about them.
Vinegar. Not a gentler alternative to bleach. The opposite. Vinegar is acetic acid, acetic acid attacks calcium carbonate, and calcium carbonate is what the object in your hand is made of. The fizzing that looks like cleaning is the specimen dissolving. It takes off the crust you wanted gone and then keeps going into the surface underneath, softening the pore detail and rounding the rim. On a plate roughly a millimeter thick there is very little material to spare. No dilution fixes this, because the reaction is with the test and not with the dirt.
The dishwasher. Suggested constantly, and it is four bad ideas running at once: heat, detergent, high pressure jets, and a rack that supports a thin disc at two or three contact points. Any one of them alone would be enough.
Direct heat. An oven, a hair dryer, a dashboard, a hot windowsill, a radiator. Heat is only a way of drying fast, and fast is the entire problem.
Scrubbing. A brush on a wet test does take the stain off. It also takes off the fine stippling where the spines attached and the cut edges of the petal pores, which is the detail that makes a test look like an animal rather than a plaster disc. If something will not lift with soaking and a gentle thumb, the honest options are to leave it or to accept the loss. There is no third one. Blades, wire brushes and picks belong nowhere near this.
Getting the sand out of the inside
Sand works in through the central mouth opening on the underside and through the lunules, the slots cut clean through the disc, and once inside it settles between the small internal props that hold the two walls apart. That is the fine grinding you hear when you tilt a dry test slowly.
It comes out with water and patience and with nothing else.
- Submerge the test completely and leave it there. Sand does not move usefully inside a dry test.
- Under the water, tilt it slowly through its full range, over and over, and let the grains find the openings. Slow is the point. The sand needs time to travel, and quick shaking just packs it tighter.
- If you tap it at all, tap it against a folded cloth or the flat of your palm. Never against a sink.
- Change the water and repeat across the whole soak. What comes out comes out over several sessions rather than in one.
What not to do: never push a rigid tool through a lunule or into the mouth opening. Those edges are the thinnest and most heavily loaded part of the entire structure, and a wire or a skewer levered around inside a test breaks it from the middle outward. And keep the running tap out of the openings, for the same reason as before.
Then accept the remainder. Some sand sits behind the internal props and is not coming back out through a path it can no longer find. It adds a little weight, it does no harm, and every serious collection contains tests that rattle.
Drying, which is where they are actually lost
More sand dollars are destroyed drying on a kitchen counter than by anything anybody did to them in a bowl. The mechanism is covered in full on why sand dollars break, and it comes down to salt crystallizing inside the pore space and one face shrinking faster than the other across a wall roughly a millimeter thick. What follows here is only the method.
- Flat on a towel, with the entire underside supported. Never balanced on a rim, a rack or the lip of a dish.
- In the shade, indoors, with air moving in the room and nothing blowing directly at it.
- Turn it once a day so the two faces dry at about the same rate. That one step prevents most overnight cracks.
- Days, not hours. A test can feel bone dry on the surface while the mesh inside is still holding water, and the surface is not the part you are waiting on.
- No heat of any kind, and no direct sun, which is heat plus fading.
Two signs it is genuinely dry: it has stopped losing weight between one day and the next, and it no longer feels cool against the back of a hand. If either is still true, give it longer. Nothing you do next should happen before this stage is finished, and that includes packing one to fly home. TSA allows clean, dry sea shells in both carry-on and checked bags, and dry is the operative word: a test still holding water inside is heavier, weaker and far easier to break in a bag.
Stains that are not going to come out
Some discoloration is sitting on a surface and some of it is in the material. Telling them apart saves you from scrubbing at something that was never going to move.
Green is usually algal film. It is usually shallow, and a long plain soak generally takes it.
Gray to black is usually iron sulfide staining from burial in oxygen-poor mud. It is inside the material, it is not going to soak out, and it does not mean the test is a fossil. Something that died recently can be blackened by a spell in the wrong sediment.
Tan, orange and rust come from iron and from tannins in the water, and are also usually in the material rather than on it.
Blotchy, uneven paleness is not a stain at all. It is uneven bleaching by sun and surf, which is the reason a test is white in the first place.
Which leaves the option most pages will not name: keep the stain. A gray-mottled test off a mud flat is a record of where it lay. A group of tests in different tones is more interesting on a shelf than a row of identical white discs, and a row of identical white discs is what a shop sells. If you would rather have a white one, the beach hands out white ones constantly, and waiting for a better specimen costs the one already in your hand nothing at all.
When to stop
The failure with no warning sign is cleaning past the point where there was anything left to clean, because at every step it feels like progress.
An over-cleaned test is easy to recognize once somebody points it out. A flat, uniform, sugary white with no tone anywhere in it. A surface gone faintly powdery that leaves chalk on a fingertip. A rim that has lost its edge. A five-petal figure gone soft, its pore detail blurred into the surface rather than cut into it. It looks manufactured, and in a sense it is: what you have done is take a natural surface down to a raw, fresh, undifferentiated one.
Two questions settle it. Does it still smell? Does it still shed sand or grit? If both answers are no, then it is clean, whatever color it happens to be. Everything past that point is cosmetics performed on a plate that has none to spare.
The rule we use costs nothing: put it down for a day. A test that looked like it needed one more soak on Sunday evening almost never does on Monday.
What comes after the cleaning
Two things, and both of them wait until the drying is completely finished.
Hardening is a separate decision. The question always follows cleaning, usually because the test now feels fragile, which it is. Anything brushed onto a damp test seals water into the mesh under a film, so timing matters. So does the trade: a consolidant soaked into a porous test does not come back out, and reversibility is the principle serious collections are built on. How to harden a sand dollar covers the method, when it helps, when it yellows, and exactly what you are giving up.
Write the label before the test goes in the water, not after. Cleaning is when localities die. Three tests from two different days go into one bowl on the counter and come out anonymous, and nothing brings that back. Where, when, what the bottom was like, and who found it. A specimen without a label is a decoration; with those four fields it is data, and that distinction is most of the hobby. Starting a shell collection covers labeling, grading, and the storage chemistry that ruins collections long after the cleaning is done. One practical note that belongs here: keep the paper out of the bowl.
Out here
Somebody asks this on nearly every trip, usually holding their first whole one and already planning what to do to it. The short version, given at the rail: rinse it now while it is wet, soak it in plain fresh water and change the water when it clouds, keep the vinegar and the dishwasher away from it entirely, and dry it flat in the shade for longer than you think it needs. Leave the bleach alone unless you have decided, knowing the trade, that you want it.
Everything else about the animal, part by part and species by species, sits in the rest of our sand dollar codex. If you would rather learn it with one in your hand, trips run three times a day out of San Marco Marina in Goodland and you can reserve a seat.
Questions people actually ask
Should I bleach a sand dollar?
We do not, and experienced collectors genuinely split on it. Bleach lifts organic residue and odor, and it whitens, but it can damage color and structure, and on a test that risk lands on a plate roughly a millimeter thick. It also forces a second full soak and a second full dry, and drying is where tests are actually lost. If you do it, dilute heavily, watch it the whole time, and rinse far longer than you soaked.
Can I clean a sand dollar with vinegar?
No, and vinegar is worse than bleach rather than gentler. Vinegar is acetic acid, acetic acid attacks calcium carbonate, and calcium carbonate is what the test is made of. The fizzing people take for cleaning is the specimen dissolving. It removes the crust, then keeps going into the surface underneath, softening the pore detail and rounding the rim. No dilution fixes it, because the reaction is with the test itself.
How long should a sand dollar soak in fresh water?
Judge by the water, not by a clock. Change it whenever it clouds. Salt comes out of the pore space in hours, so a bleached test off dry sand may need only a few changes across an afternoon. A test that still smells, or that hazes the water at every change, is not finished and can run for days. We can point you to no controlled study of soak times, and neither can the pages quoting you a number.
How do I get the sand out of the inside of a sand dollar?
Water and patience. Submerge it completely, then tilt it slowly through its full range under the water, over and over, and let the grains find the mouth opening and the slots. Change the water and repeat across several sessions. Never push a wire or a skewer inside: those edges are the thinnest part of the structure. Some sand will stay behind the internal props, and that is normal. It adds weight and does no harm.
Why did my sand dollar crack after I cleaned it?
Almost always the drying rather than the cleaning. Salt crystallizes inside the pore space as the water leaves, and if one face dries faster than the other the two sides pull against each other across a wall roughly a millimeter thick. Heat accelerates all of it, so a windowsill or a dashboard is the usual culprit. Dry them flat on a towel, in shade, turning once a day, over days rather than hours.
How do I get the smell out of a sand dollar?
A smell means organic residue is still in there, and time in plain fresh water removes it. Keep the test fully submerged, change the water whenever it clouds or smells, and expect days rather than hours. The smell fading is your actual finish line, more reliable than how white it looks. Bleach shortcuts this at a cost, so decide that on its own terms rather than out of impatience with a bowl.
Can I put sand dollars in the dishwasher?
No. It combines four separate problems: heat, detergent, high pressure jets, and a rack that supports a thin disc at two or three contact points. Any one of them would be enough on its own. The same reasoning rules out an oven, a hair dryer and a hot dashboard. Heat is only a way of drying fast, and drying fast is what breaks these. Cool water, plain, and time.
Where this comes from
Every factual claim on this page traces to a published source. Where the science or the law is genuinely unsettled, we say so on the page rather than pick the tidier answer.
Come find them with us
Three trips a day out of Goodland, into water the road does not reach. Captain-led, family-friendly, and timed to the tide.